
Failover & High Availability Explained
How Load Balancers Keep Applications Running During Failures
1. Problem Statement
Imagine this:
Your application is running fine.
Traffic is flowing. Everything looks healthy.
Suddenly, one backend server crashes.
What happens next?
Some users start seeing errors
Others still get responses
The issue becomes random and hard to debug
Without proper handling:
Requests continue going to failed servers
Users experience downtime
Revenue and trust are impacted
This is exactly the problem Failover and High Availability (HA) are designed to solve.
2. Concept Explanation
What is Failover?
Failover is the process of automatically shifting traffic from a failed component to a healthy one.
Analogy:
If one cashier in a store stops working, customers move to another counter.
What is High Availability (HA)?
High Availability is a design approach to ensure the system continues to operate even when failures occur.
It’s not just reacting to failure —
it’s about designing systems so failure does not cause downtime.
Difference (Simple View)
| Concept | Focus |
|---|---|
| Failover | Reaction after failure |
| High Availability | Design to avoid downtime |
3. Types / Variations
Active / Passive
One system is active
Second is standby
On failure → standby takes over
Active / Active
Both systems handle traffic
Load is distributed
If one fails → others take over
Backend Failover vs Load Balancer HA
| Type | Failure | Behavior |
|---|---|---|
| Backend Failover | Server fails | Traffic shifts to another server |
| LB HA | Load balancer fails | Secondary LB takes over |
4. How It Works Internally
Step 1 — Failure Detection
- Health checks detect server failure
Step 2 — Server Marked DOWN
- Removed from traffic pool
Step 3 — Traffic Rerouting
- Requests go to healthy servers
Load Balancer HA Flow
Primary LB is active
Secondary LB is standby
Primary fails
Secondary takes over
Behind the scenes:
Configuration sync
Optional session/state sync
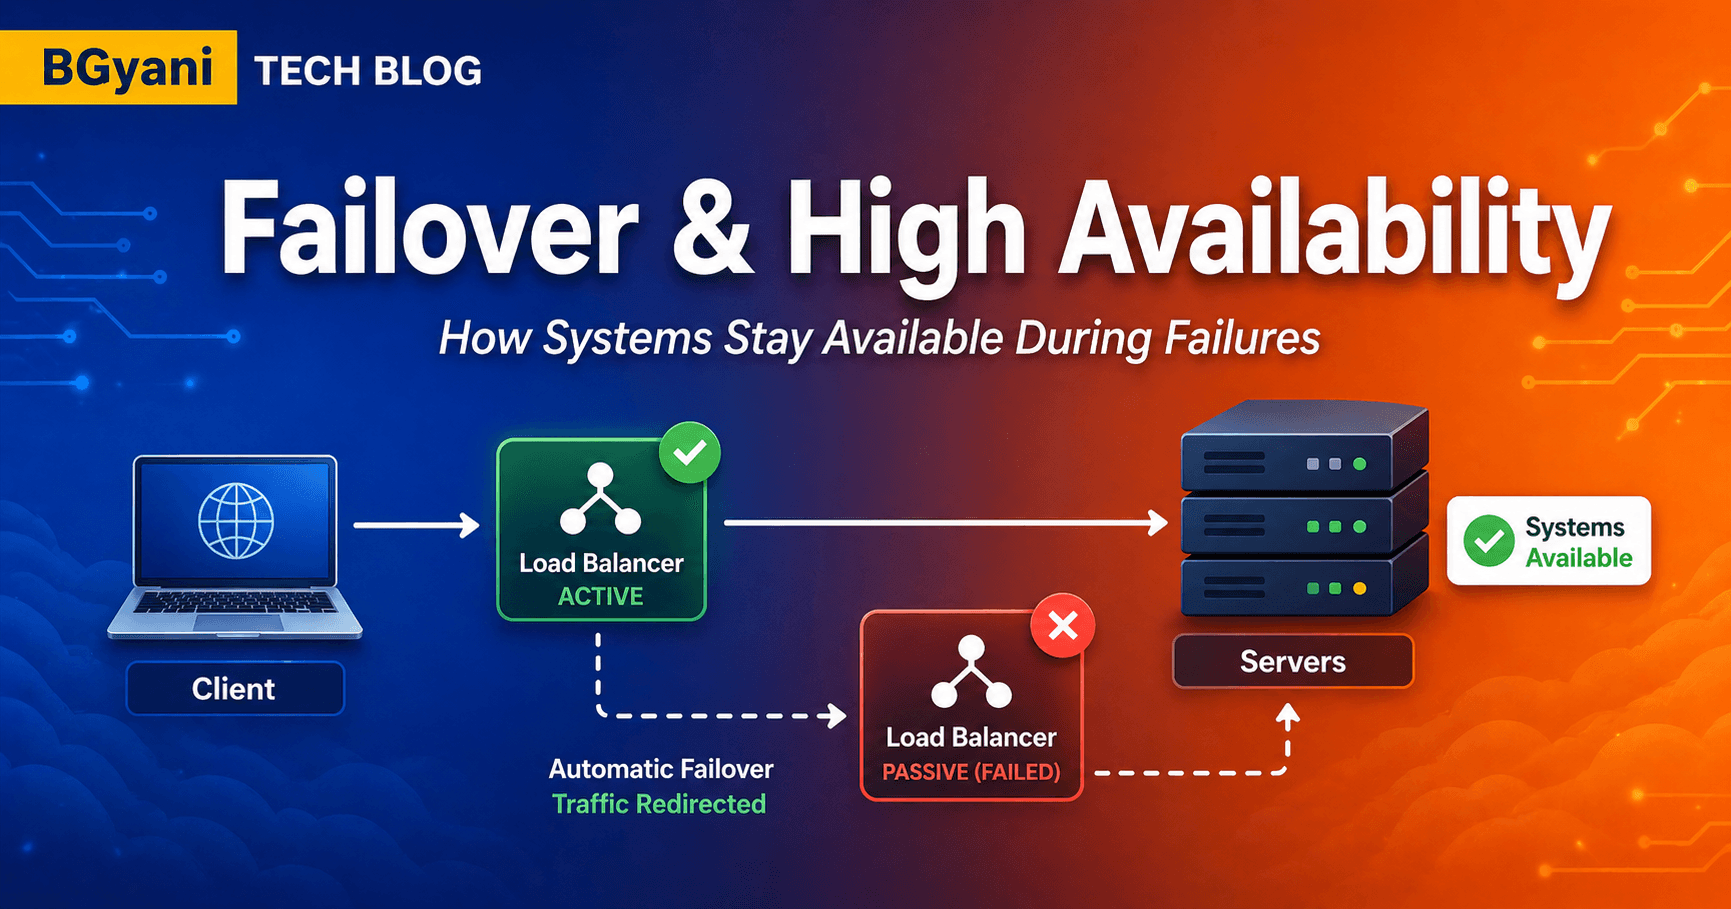
5. Diagram

Client → Load Balancer → Servers
One LB marked RED (failed)
Traffic flows only to GREEN LB.
6. Real-World Example
Consider an e-commerce checkout system.
User clicks “Pay Now”
Request hits a backend server
If that server fails:
Without failover → transaction fails
With failover → traffic shifts to another server
User experience:
No visible error
Payment completes
This is invisible reliability.
7. Common Issues / Pitfalls
Failover Delay
Slow health checks
Delay in detection
Session Loss
Session tied to failed server
No persistence or sync
Misconfigured HA
Secondary not ready
Sync issues
Split-Brain
Both LBs active
Traffic inconsistency
8. Try It Yourself 👇
Open Full Visualizer Server Failover
Open Full Visulaizer LB HA Failover
9. Key Takeaways
Failover shifts traffic after failure
HA ensures system stays available
Health checks drive decisions
Load balancer is central control point
Configuration matters as much as design
10. Conclusion
Failures are inevitable.
What matters is how your system responds.
A well-designed setup ensures:
Minimal downtime
Smooth user experience
Reliable system behavior
11. Final Thought
A strong system is not one that never fails.
It’s one that fails gracefully and recovers instantly.
12. Practical: NetScaler Hands-on
12.1 Mini Lab
Create LB vServer
Add 2 backend servers
Send traffic
Stop one backend
👉 Observe traffic shifting
12.2 Variation / Experiment
Disable a service manually
Observe failover timing
12.3 Commands
# Check HA status (Primary / Secondary, sync state, health)
show ha node

# View detailed HA configuration (interfaces, sync settings, failover config)
show ha node -detail

# Force a manual failover (simulate Primary failure → Secondary becomes Primary)
force ha failover

# Disable HA on current node (used for testing failover or maintenance)
set ha node -hastatus DISABLED

# Re-enable HA after testing (node rejoins HA pair)
set ha node -hastatus ENABLED
Series Continuity
Before we explained the Health mechanism works on NetScaler.